Tuesday, 17 January 2012

The Moon and Registax

As part of my goal this year to get more knowledgeable on astronomy, I finally got round to trying out Registax to stack some photos I took of the Moon ages with this very thing in mind.

I always wanted to try this out but to date did not have a computer powerful enough to really do it. But that has recently changed as I finally have a decent computer in the form of a Dell XPS 15, which I must say is rather nice! Its an i7 with 4Gb of ram so it will serve purposes such as using Registax perfectly. This is compared to my Samsung N130 netbook, which was my main computer before, with its little 1.6GHz Atom processor.

Anyway, I know with most astrophotography that is built up from stacked images, the source is usually a video feed, which I guess is like having lots of individual photos, but combined in a video. Registax pulls out the individual frames like photos anyway. I had 5 photos that I took on my Fujifilm HS10. I took them as a 'burst' so they were all within about 1 second, so little movement between shots (not that it really matters).

Tuesday, 12 April 2011

A Photo Of The Moon

A photo I took of the moon with my HS10. I used the 'A' (Aperture priority) mode, set AE to 'spot' and maximum F number for the aperture (smallest physical aperture).

Wednesday, 13 October 2010

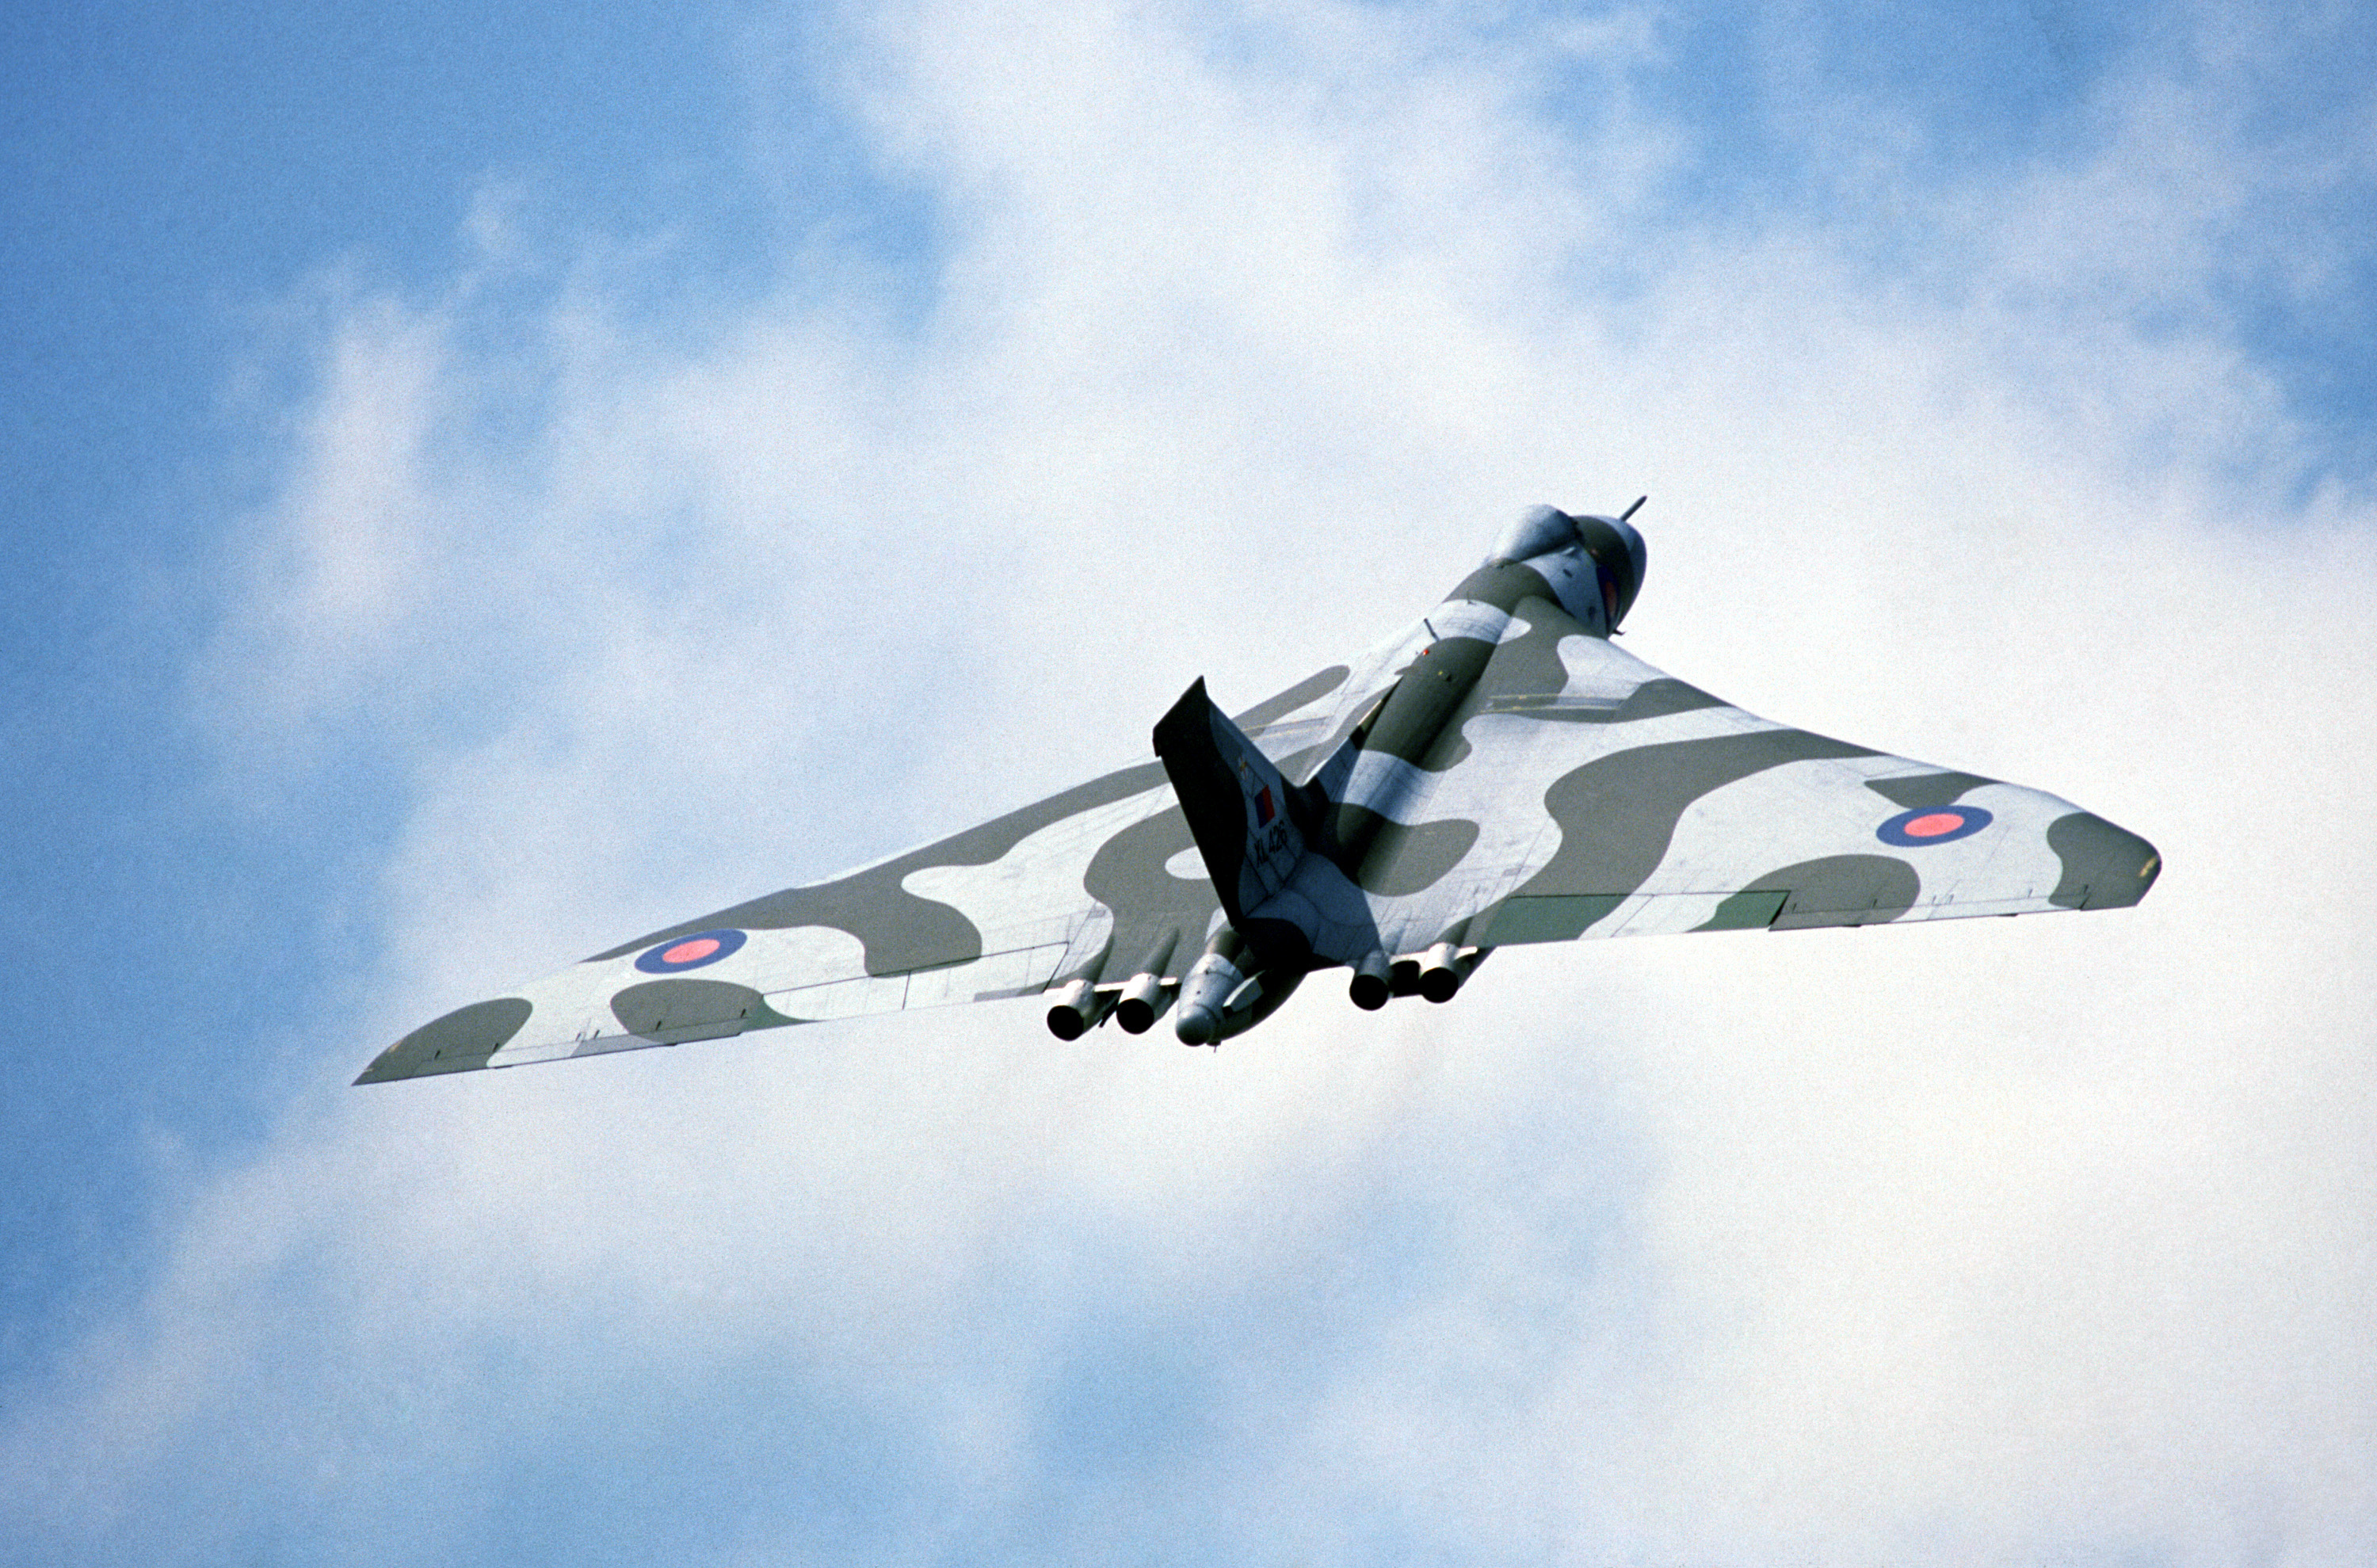
Vulcan Bomber Spotted


Today I went out at lunchtime to watch a few work colleagues fly their model planes, and which were quite nice. There were two regular looking planes, one of which was a P51 Mustang (Caddillac of the sky) and also a really great looking bi-plane. They were all quite large scale models.

Whilst watching we were quite amazed at the odd sight of a real life bi-plane flying over, which seemed to odd coincidence as it's not every day you see one, especially not when currently flying a model one!


But then, to add to the bizarre aeronautical experience, low and behold in the not too far distance, a bloody great Vulcan Bomber came flying by! I couldn't believe what I was seeing! It was far enough away to be rather quiet but that just added to the impression of how large it is as it looked huge even in the distance.

It was flying very low and pretty slow and was accompanied by a smaller plane which just looked miniscule in comparison. Unfortunately it didn't come over head but made a long circle around us.

Even more bizzarely coincidental was the fact that I had been standing under one of these the previous weekend in the RAF museum, London (an excellent place to visit). When under one it is absolutely massive!

Apparently this is the only one left flying now an looking it up today it looks like it's not likely to be flying any more. They need to raise a lot of money to keep it air worthy. Check out the appeal website.

Feel privileged to have seen it.

Friday, 24 September 2010

The Moon, Jupiter and Galileoscope

Last night I went out to look at the pretty much full moon. It was really bright last night! Illuminating the garden enough to easily read a book by.

Whilst looking at the moon, Jupiter was VERY visible to the lower right of the moon, less than a fist's width away! Was an awesome sight. Jupiter has just (in the last few days) passed a point where it was closest to Earth for some years and is just past opposition.


The Moon and Jupiter. Poor photo taken with my phone.
Click to Enlarge


I couldn't get over how bright Jupiter was so I did what any good geek would do and got my binoculars out. Whilst collecting my binoculars I thought, hmm, may as well grab my Galiliescope as well.

I bought the Galileoscope last year when they first started releasing them. I have had a few plays with it but not a lot. I only have a camera tripod (which is better than no tripod!) and keeping it steady and navigating the sky can be tricky. But I have seen Mars through it and also had a nice view of the Orion Nebula. The Orion Nebula was definitely recognisable as a cloudy splurge, which was enough to get me excited and Mars was still just a round dot, but it was nevertheless a disc as opposed to just a point of light. Also it was a bit 'salmony' pink in colour, making it definitely more than just a star (by star I just mean point of light).

But last night, I looked at Jupiter firstly with my binos and even though it was hard to hold them steady, I could definitely detect it was a disc not a point of light. And I could also, for the first time, distinguish what looked like a moon of Jupiter to it's side!! I was amazed that I could make that out with just my binos!

So I got the Galileoscope quickly set up and pointed it at Jupiter. It was tricky getting the telescope to point at Jupiter, firstly to actually aim it at it and secondly to finely adjust the direction it was pointing was impossible with my camera tripod. It was a case of squeezing it in the direction I wanted to move, over-shoot, knowing it would spring back to where I want. Not very clever but all I could manage. Also, I had to ensure no single part of me touched the scope or tripod as it just wobbled like mad.

But it was worth it! I got a view of Jupiter through the scope and was able to distinguish definitely three of the four Galilean (quite fitting with my scope) moons! I was again amazed. Not only could I make out the moons, but I could also just about make out a band roughly around Jupiter's equator!!! It was mostly a bright white disc, but definitely with a slightly darker band around the middle.

I was chuffed! Can easily see why people get the bug and want bigger and better telescopes all the time. I will definitely, when life/finances allow, get myself a decent telescope one day.

Monday, 23 August 2010

Backing Up My Life With Amazon Web Services

Amazon's Simple Storage System or S3 for short, is what I have decided to use from now on (for now until I discover yet something else) to backup my life.

S3 seems to be the solution I have been looking for for ages. A simple, flexible, no-contract, reliable and easily accessible storage facility that resides entirely in the cloud. Its cost is based on exactly what you use; rather than renting a fixed amount of space on some server, you just pay AWS for what you use of their services. So if you upload N amount of data you will be charged for storing N amount of data per month. If you access that data for COPYing GETting or PUTting commands then you will be charge per command. So you can use it as little or as much as you like.

There is a perfect little application called s3sync which is a small ruby program which syncs data you specify to S3. It works very much like rsync. This is ideal as it is a command line program so I can run it on my web server which contains a lot of data I wouldn't like to loose, such as family photos/videos.

I altered my backup script to now use this new method, based on a great tutorial I found on the web, which is dated as 2006, so this has been around for a long time.
#!/bin/bash #Backup script for server

#set variable of date for labelling date=`date +%F`

cd /home/user/backupdata/

#remove oldest mysql backup rm `ls -t *mysql* | tail -n 1`

#Dump mysql databases mysqldump --all-databases > /home/user/backupdata/${date}_mysql_backup

cd /home/user/bin/s3sync/ export AWS_ACCESS_KEY_ID=My Amazon Access Key ID
export AWS_SECRET_ACCESS_KEY=My Amazon Secret Access Key
export SSL_CERT_DIR=/home/user/bin/s3sync/certs
export AWS_CALLING_FORMAT=SUBDOMAIN
ruby s3sync.rb -r -v --ssl --exclude="/home/user/some/dir" --delete /home/user mybucket:
ruby s3sync.rb -r -v --ssl --delete /var/www mybucket:


I have this setup as a cron job once a week.

Friday, 20 August 2010

Upgrade Drupal Core and Restore from Mysql Backup

For too long the admin pages in my http://drupal.org site have been bugging me to upgrade from 6.12 core to the latest, which recently for to 6.19. I have been putting it off after reading the upgrade.txt which describes how to do it as it sounding a little lengthy and I just never had the time to do it.

I tried once but it didn't work. I went 'more or less' through the process described in upgrade.txt, which accompanies the download, but after doing it the admin pages still said it was out of date, as if I hadn't done anything, which was odd as I had deleted almost everything and replaced it with the new version.

Anyway, I came back to it recently and decided to sort it out. I downloaded the latest core and followed the instructions to the letter. But once again, my admin pages still showed me at 6.12, as if I had just done nothing!

This was obviously a bit annoying as I had very carefully followed the documentation. So I put my problem out in the #drupal-support IRC room on irc.freenode.net and started getting some helpful hints to start tracking down the problem.

The very best bit of information I got was a suggestion to use drush. drush is a command line program that you run in a terminal on the web server, within the site root. It is a simple little program that can perform such functions as checking the current status of the site, check for updates of modules, install those modules, clear cache, run update.php etc. The beauty is the feedback it gives you, highlighting any problems with error messages to help track down problems.

The first problem I came across when trying to update all modules was a duplication error, where one 'piece of code' was conflicting with another of the same name. This was preventing modules from updating. So after tracking down and removing the duplicate files, all modules (except core) updated seamlessly.

Now every time I ran the command drush pm-update or drush up drupal to try and get the core module, drupal, to update from 6.12 to 6.19, it would run through the apparent process with successful messages, but then if I ran them again, it would keep saying it was at 6.12 and needed updating. So the update was failing.

Trouble was that drush wasn't reporting any error messages and even drush core-status would confusingly say it was at 6.19, but everything else said 6.12.

I tried to track down any duplications in my site's directory but there was nothing. So I finally decided to start afresh and wipe everything out and install 6.19 as new.

To ensure I would not loose all my site content, including nodes, images, modules, theme, functionality I needed to ensure I backed up everything I could possibly need.

I made a complete copy of my site's root directory, in this case /var/www/. I also made an up to date dump of the mysql database, very important as this is where everything is contained.

To make a backup of the mysql database:
mysqldump drupal > drupal_dump.sql

Obviously ensure you back up the right database. In this case my database was called 'drupal', but it could have been called anything. If you need to add certain user and password options, add -u username -p password after mysqldump. This will create a text file containing the whole database. I wasn't sure how I would use it yet, but I just knew backing it up was the thing to do if I stood any chance of putting all my data back into the new site.

Next was to make the bold move and empty var/www. I then dropped the database in mysql.

To drop a database, enter the mysql environment with 'mysql' with admin privileges, then simply enter the command DROP DATABASE drupal;. I then re-created the database so it was new and empty, but using the same name: CREATE DATABASE drupal;

I then, perhaps niavely, believe that I have to use a unique user for each mysql database I have so I issue the following command to grant privileges to my chosen user on the drupal database:
GRANT ALL PRIVILEGES ON drupal.* TO myuser@localhost IDENTIFIED BY 'password';

Next I downloaded and unpacked the latest drupal core:

cd /var/www/
wget http://ftp.drupal.org/files/projects/drupal-6.19.tar.gz
untar xvf drupal-6.19.tar.gz


I then went to my root page in a web browser and ran the standard install script to get a new, empty up to date drupal installation.

Next was to get all my existing data back into my site for the mysql backup to try and make it appear as if everything is just as it was before.

The key to getting all content and settings back is to write the mysql dump back into mysql into the newly created, albeit same named, drupal database. But before this will work, you have to put all the modules that were present in the installation when the mysqldump was performed back in place so that the database doesn't get confused thinking it has modules installed that are not present.

To find out which modules were installed I created a temporary database in mysql and wrote the backup into that just so I could examine it. To write a mysqdump into a new database:

mysql drupal_tempdb < drupal_dump.sql

I then wanted to view what modules were installed in this database backup. To do this I viewed what tables were in the database in the mysql environment:

USE drupal;
SELECT * FROM system WHERE TYPE = 'module';


This showed me all the entries in the system table containing the modules. I could then examine this list to see what modules were installed and also, importantly, which versions of each module. This is though where the backup of /var/www/ comes in handy, as all the modules that were installed are contained in here. So using the list in mysql, which also tells me the location of each module. So I just copied each module back from the backup into the right location in the new installation.

Once I was happy that I had replaced all the existing modules, I wrote my drupal database dump in to the new database and ran update.php............... and it was mostly back!

All my themes were back (after copying the theme dir from backup), all my nodes and views were working. There were just some files missing, such as uploaded images, but again copying these back in from the back up solved this.

Saturday, 7 August 2010

Seesmic Desktop on Ubuntu


I have been using Seesmic (#seesmic @seesmic) on my Android phone (HTC Desire) for a while now and must say I like it a lot. Just works nice and looks good. Plus support for Facebook is coming soon and I like the 'all-in-one' type of approach.

I had a look at the great Seesmic web app. and it looks great, works anywhere you have a web browser. Also noted they have a desktop client too, which runs using Adobe Air. Adobe Air is avaible to install from the repos in ubuntu so I gave it a go.

First:

sudo apt-get install adobeair


Once installed, this added Adobe Air Application Installer to the Applications > Accessories menu.

Download the air file from the seesmic website

Open that from the menu and it prompts you to browse for an air file to install, simply follow on-screen instructions to install the app. You will be prompted for your admin password.

Once installation is complete follow the simple set up wizard to add Twitter and Facebook accounts.

Great app., check it out.